Lasting Memories
Tuesday, June 22, 2010
Fine Art Template
Brooke Playing Guitar; 6-01-10; 11:15pm; Carriage House Apartments; f 5; 10/200; Nikon D60
Taylor Chapel; 6-22-10; 10:30; BYU-Idaho; f 5.6; 1/1000; SONY DSC-H7
For both of these images I put them into a fine art template. First I created the template by using the rectangle and filling with black. Then I held shift and made 4 more rectangles. I put the text "Erica Argüello Photography" using the font Tekton Pro. I then opened an image and placed it onto of the 5 rectangles. In the layers pallet, I pushed option and clicked the chain so the image would insert itself behind the rectangles. I moved the images around to where I thought it would look good.
Monday, June 21, 2010
Photolusion
Brittany Looking;6-21-20; 8:10pm; Rexburg; Idaho; f 4.5; 10/2500; SONY DSC-H7
Water Bucket Water Park; 6-21-10; 8:34; Porter Park; f 4.5; 10/1250; SONY DSC-H7
Diana lovin' her ice cream; 6-19-10; 4:32pm; Idaho Falls, ID; f 7.1; 1/125; SONY DSLR-A100
The straight photolusions were hard to take because you want to think outside the box. You don't want to have a picture other people would think of. I saw this ice cream on a building, and had my roommate act like she was holding it. The other picture with Brittany, we saw a hammock and it looked like a smile, so I made it part of her face.
For the edited photolusions, I took Brittany on both of then, used the quick selection tool, and placed her in the background photo. Then I shrunk her so she would look miniature next to the things around her. I changed the levels on all of the but the bucket. I also added a vignette on all the photo except for the blended weeds with Brittany.
Tuesday, June 15, 2010
Edge Effects
Brittany; 5-30-10; 7:50pm; Rexburg Temple; f 4.2;1/320; NIKON D60
For All Eternity; 6-15-10; 7:30pm; f 3.5; 1/500; NIKON D50
Rexburg's Greens; 6-15-10; 8:35pm; Idaho, f 8; 1/200; SONY DSC-H7; Shutter Priority
For Brittany I used the flexible brushed-on effect. I used this one so that if I messed uop I could bring it back. I added a new layer, filled it wil white. Then I put a black mask on the image layer placing it above the new layer. Then I used the think brushes and changed the opactiy.
For Doug and Kendra,I did a burned border by using the marquee tool. Then I hit delet. I added text at the very end as well.
For the Rexburg greens I used the sprayed edge effect. I put a quick mask on, used filter, sprayed effects. Then I changed the radius. Then I used the eyedropper to pick out the color of the sun to use it as my background.
Night & Light
Great Balls of Fire; 6-15-10; 12:34am; Rexburg, ID; f 2.7; 80/10; SONY DSC-H7
Head; 6-15-10; 12:21am; Rexburg, ID; f 2.7; 80/10; SONY DSC-H7
Circles; 6-15-10; 12:50am; Rexburg, ID; f 2.8; 16/10; Sony DSC-H7
For each of these I used blue and green glow sticks. For the circles I tied the glow sticks on stings and spun them. The shutter was open for 4 seconds.
For the head, the shutter was open for 8 seconds and 3 people moved around the glow sticks.
For Great Balls of Fire, I stood in that position and had my roommates outline me like I was holding fire. Shutter was open for 7 seconds.
Tuesday, June 8, 2010
Template & Clipping
Original Template
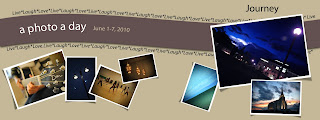
A Photo a Day in Rexburg, Idaho.
I first opened the original template in Photoshop. Then I opened the images from the week's photos. Next I clicked on the layer with a photo frame Iwanted to use. Then I dragged my image over the photo frame and size it down. In the Layers palette, I right-clicked the new photo layer and choose Create Clipping Mask. After doing this, I added the text "Live*Laugh*Love." I also changed the dates, and added the word "Journey," instead of "Dates."
7 Day Journal June 1-7, 2010
Brooke Playing Guitar; 6-01-10; 11:15pm; Carriage House Apartments; f 5; 10/200; Nikon D60
Rexburg, Idaho LDS Temple; 6-02-10; 9:02pm; Idaho; f 5: 10/1000; Nikon D60
Kirkam Chandeliers; 6-03-10; 9;45pm; BYU-Idaho; f 5.6; 10/600; Nikon D60
Dancers; 6-04-10; 10:17pm; BYU-Idaho; f 4; 10/300; Nikon D60
Temple Lights; 6-05-10; 9:34pm; Rexburg, Idaho; f 5.6; 10/300; Nikon D60
Field; 6-06-10; 9:02pm; Rexburg, Idaho; f 4; 10/600; Nikon D60
Lightning Clouds; 6-07-10; 9:53pm; BYU-Idaho; f 3.5; 10/50; Nikon D60
For Brooke playing the guitar, I used an adjustment layer, using the overlay application. I changed the levels slightly. I wanted the top of the guitar to be clear, and the rest blurry and that's how it turned out luckily.
For the Rexburg Temple, I also used the overlay application using an adjustment layer. I changed the levels, mainly the gray slider so the temple wouldn't be so dark.
The chandeliers looked pretty good in color, but I wanted them in black and white to have an older look to them. I put a vignette on this photo. To make it black and white, I used an adjustment layer , using the gradient map. I adjusted the levels slightly.
I used an adjustment layer on the dancers, using the soft light. I cropped it to take out the couple dancing...but not in the mirror. It seemed distracting to only have part of the girls body and not the man. I then put a vignette.
For the Temple Lights, I used an adjustment layer, using soft light. I then adjusted the levels so the bottom of the light wasn't so dark.
For the field across the Rexburg Temple, I used an adjustment layer, using the multiply application. I also changed the color balance. I increased the blue and greens. I put a vignette on it , but increased the midpoint.
This last picture was taking during a lightning storm!!! It took a while to actually get the lightning. I clicked half way on the camera and waited and waited for lightning to come and clicked the rest of the way. I focused on the clouds so it would be clear. I put and adjustment layer on and used the overlay application. I increased the blue in the color balance slightly
Subscribe to:
Posts (Atom)